
Vuex
vue에서 컴포넌트 간의 정보 전달을 위해서는 props(부모→자식)와 event(자식→부모)를 사용했습니다다. 부모-자식 관계가 아니거나 계층구조가 복잡해지면 EventBus를 사용했습니다. 그러나 이벤트 버스 객체를 사용하는 방식도 애플리케이션의 규모가 커지만 복잡도가 커져서 사용이 힘듭니다. 이러한 이유로 나온것이 바로 'Vuex'입니다.
각 컴포넌트가 공유하는 상태 데이터는 전역에서 Store저장 객체를 통해서 관리할 수 있습니다. Store에 전역데이터와 메소드들을 저장해 놓으면, 언제든지 원하는 로컬 컴포넌트와 연결해서 사용할 수 있습니다. 이를 통해 우리는 좀 더 투명하고 유지보수가 뛰어난 코드를 활용할 수 있게됩니다.
지금부터 Vuex의 전역데이터와 메소드들을 어떻게 사용하는지 간단한 예제로 살펴보겠습니다.
먼저, Store디렉토리를 만들고 그 안에 index.js 페이지를 만들어줍니다. 여기서 전역으로 선언한 데이터와 메소드들을 app.vue컴포넌트에서 가져다가 쓰겠습니다:)
1. State
먼저, Vue의 use 속성으로 Vuex를 호출하여 플러그인을 사용할 수 있게합니다. 그리고 Vuex의 Store를 생성해주세요.
그리고 State안에 원하는 전역데이터를 선언해줍니다. 저는 예제로 member들의 정보를 담았습니다.
store > index.js
import Vue from 'vue';
import Vuex from 'vuex'

Vue.use(Vuex);

export const store = new Vuex.Store({
    state: {
      members:[
        {
          id: 1,
          name: 'jiwon',
          team: 'engineering',
          position: 'Server Developer',
          emailAddress: 'jiwon@google.com',
          phoneNumber: '010-xxxx-xxxx',
          birthday: '1994/11/08',
        },
        {
          id: 2,
          name: 'jimin',
          team: 'markerting',
          position: 'markerter',
          emailAddress: 'jimin@google.com',
          phoneNumber: '010-xxxx-xxxx',
          birthday: '1992/03/26',
        },
        {
          id: 3,
          name: 'hansu',
          team: 'engineering',
          position: 'Web Developer',
          emailAddress: 'hansu@google.com',
          phoneNumber: '010-xxxx-xxxx',
          birthday: '1994/09/08',
        },
        {
          id: 4,
          name: 'nayoung',
          team: 'engineering',
          position: 'Web Developer',
          emailAddress: 'nayoung@google.com',
          phoneNumber: '010-xxxx-xxxx',
          birthday: '1995/04/10',
        },
      ]
    },
    mutations: {
      SET_NAME(state, name) {
        state.members[0].name = name;
      }
    },
    actions: {

    }
});
UserView.vue
이제 $store를 이용해서 Store에 선언해준 전역데이터를 가져와서 뿌려보겠습니다. 'this.$store.state.데이터명'만 써주면 원하는대로 데이터를 불러올 수 있습니다.
<template>
    <div>
        <h1>USERS</h1>
        <div v-for="(item, index) in this.$store.state.members" :key="index">{{ item.name }}</div>
    </div>
</template>

<script>
export default {
    data(){
        return{
        }
    },
    methods: {
        }
    }
}
</script>

<style>

</style>
짜잔, 이름이 member의 이름이 예쁘게 출력되었네요.

2. Mutations
전역데이터를 출력하는 걸 성공했으니, 전역에 선언된 데이터를 변경시켜보겠습니다. state를 변경시키기 위해선 mutation를 사용하면 됩니다. state아래에 mutation를 선언해주세요. 저는 'SET_NAME'이라는 mutations를 만들어서 members의 첫번째 멤버의 이름을 변경시켜보겠습니다. 이를 위해서 인자로 state, payload(변경될 이름)를 넣어줍니다.
import Vue from 'vue';
import Vuex from 'vuex'
Vue.use(Vuex);
export const store = new Vuex.Store({
state: {
members:[
{
id: 1,
name: 'jiwon',
team: 'engineering',
position: 'Server Developer',
emailAddress: 'jiwon@google.com',
phoneNumber: '010-xxxx-xxxx',
birthday: '1994/11/08',
},
{
id: 2,
name: 'jimin',
team: 'markerting',
position: 'markerter',
emailAddress: 'jimin@google.com',
phoneNumber: '010-xxxx-xxxx',
birthday: '1992/03/26',
},
{
id: 3,
name: 'hansu',
team: 'engineering',
position: 'Web Developer',
emailAddress: 'hansu@google.com',
phoneNumber: '010-xxxx-xxxx',
birthday: '1994/09/08',
},
{
id: 4,
name: 'nayoung',
team: 'engineering',
position: 'Web Developer',
emailAddress: 'nayoung@google.com',
phoneNumber: '010-xxxx-xxxx',
birthday: '1995/04/10',
},
]
},
mutations: {
SET_NAME(state, payload) {
state.members[0].name = payload;
}
},
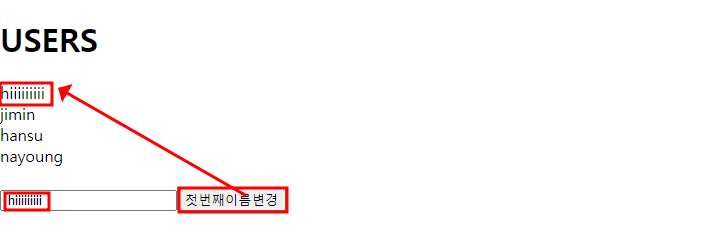
});app.vue에서는 input창에서 변경될 이름을 받고 버튼을 클릭하면 mutations가 동작하게 해주었습니다. mutations를 호출하기 위해선 commit을 사용하면 됩니다.
<template>
    <div>
        <h1>USERS</h1>
        <div v-for="(item, index) in this.$store.state.members" :key="index">{{ item.name }}</div>
        <br>
        <input type="text" v-model="changeName">
        <button @click=setName()>첫번째이름변경</button>
        <!-- {{ this.$store.state.members[0].name }} -->
    </div>
</template>

<script>
export default {
    data(){
        return{
            changeName: ""
        }
    },
    methods: {
        setName() {
            // commit: mutations를 호출
            this.$store.commit('SET_NAME', this.changeName)
        }
    }
}
</script>

<style>

</style>
짜잔, 잘 변경되는 걸 알 수 있습니다.
3. Actions
state와 mutations를 이용하면 전역에서 데이터를 가져오고 또 로컬 컴포넌트에서 데이터를 변경할 수도 있습니다. 그런데 한가지 문제가 있습니다. 비동기통신을 하는 data의 경우에는 mutations만들이용해서 데이터를 변경할 수 없습니다. 이를 도와주는 것이 actions입니다. 아래 그림처럼 비동기 통신을 하는 Backend API의 경우에는 Actions으로 데이터를 가져온다음 Mutaions를 거져 State를 변경합니다.

- 비동기 호출은 모두 Actions에서 합니다. Actions는 Vue Components에서 Dispatch라는 API를 이용해서 호출합니다. 그러면 Actions가 Backend API를 들고와서 Mutations에 호출해서 변경된 데이터를 넘겨줍니다.
- mutations아래에 actions를 만들어주겠습니다. 저는 비동기통신위헤 member의 이름을 2초 후에 변경하는 setTimeout함수를 만들었습니다. 즉, member의 이름을 변경시키는 mutations를 2초 후에 commit 하도록 하였습니다.
import Vue from 'vue';
import Vuex from 'vuex'

Vue.use(Vuex);

export const store = new Vuex.Store({
    state: {
      members:[
        {
          id: 1,
          name: 'jiwon',
          team: 'engineering',
          position: 'Server Developer',
          emailAddress: 'jiwon@google.com',
          phoneNumber: '010-xxxx-xxxx',
          birthday: '1994/11/08',
        },
        {
          id: 2,
          name: 'jimin',
          team: 'markerting',
          position: 'markerter',
          emailAddress: 'jimin@google.com',
          phoneNumber: '010-xxxx-xxxx',
          birthday: '1992/03/26',
        },
        {
          id: 3,
          name: 'hansu',
          team: 'engineering',
          position: 'Web Developer',
          emailAddress: 'hansu@google.com',
          phoneNumber: '010-xxxx-xxxx',
          birthday: '1994/09/08',
        },
        {
          id: 4,
          name: 'nayoung',
          team: 'engineering',
          position: 'Web Developer',
          emailAddress: 'nayoung@google.com',
          phoneNumber: '010-xxxx-xxxx',
          birthday: '1995/04/10',
        },
      ]
    },

    mutations: {
      SET_NAME(state, payload) {
        state.members[0].name = payload;
      }
    },

    actions: {
      CHANGE_NAME_DELEY({commit}, payload) {
        return setTimeout(()=>{
          commit('SET_NAME', payload)
        }, 2000)
      }
    }
});
그리고 app.vue에서 이제는 mutation를 호출하지 않고, dispatch를 이용해서 acions를 호출하게 하였습니다.
<template>
    <div>
        <h1>USERS</h1>
        <div v-for="(item, index) in this.$store.state.members" :key="index">{{ item.name }}</div>
        <br>
        <input type="text" v-model="changeName">
        <button @click=setName()>첫번째이름변경</button>
        <!-- {{ this.$store.state.members[0].name }} -->
    </div>
</template>

<script>
export default {
    data(){
        return{
            changeName: ""
        }
    },
    methods: {
        setName() {
            // commit: mutations를 호출
            // this.$store.commit('SET_NAME', this.changeName)

            // dispatch: actions를 호출
            this.$store.dispatch('CHANGE_NAME_DELEY', this.changeName);
        }
    }
}
</script>

<style>

</style>
이러면 2초 후에 아까와 같은 결과가 나타납니다.
4. 정리

한 마디로 정리!
state : 전역으로 쓸 데이터를 담아줍니다!
mutations: 동기로 전역 데이터를 변경시킨다!
actions는 비동기로 전역 데이터를 변경시킨다!
'지금, 개발하기 > Vue' 카테고리의 다른 글
| Vue3] data-grid _ tabulator 테마 변경 (0) | 2023.01.11 |
|---|---|
| Vue] vue.js 데이터 시각화 라이브러리 for 리포트 (0) | 2023.01.05 |
| Vue] Getters 파헤치기 (0) | 2022.04.28 |
| Vue] Vuetify 설치, 적용하기 (0) | 2022.04.08 |
| Vue] Vue CLI 3.0 프로젝트 생성하기 (0) | 2022.04.05 |


